I may receive a commission if you purchase through links in this post. I am not a doctor; please consult your practitioner before changing your supplement or healthcare regimen. As an Amazon Associate I earn from qualifying purchases.


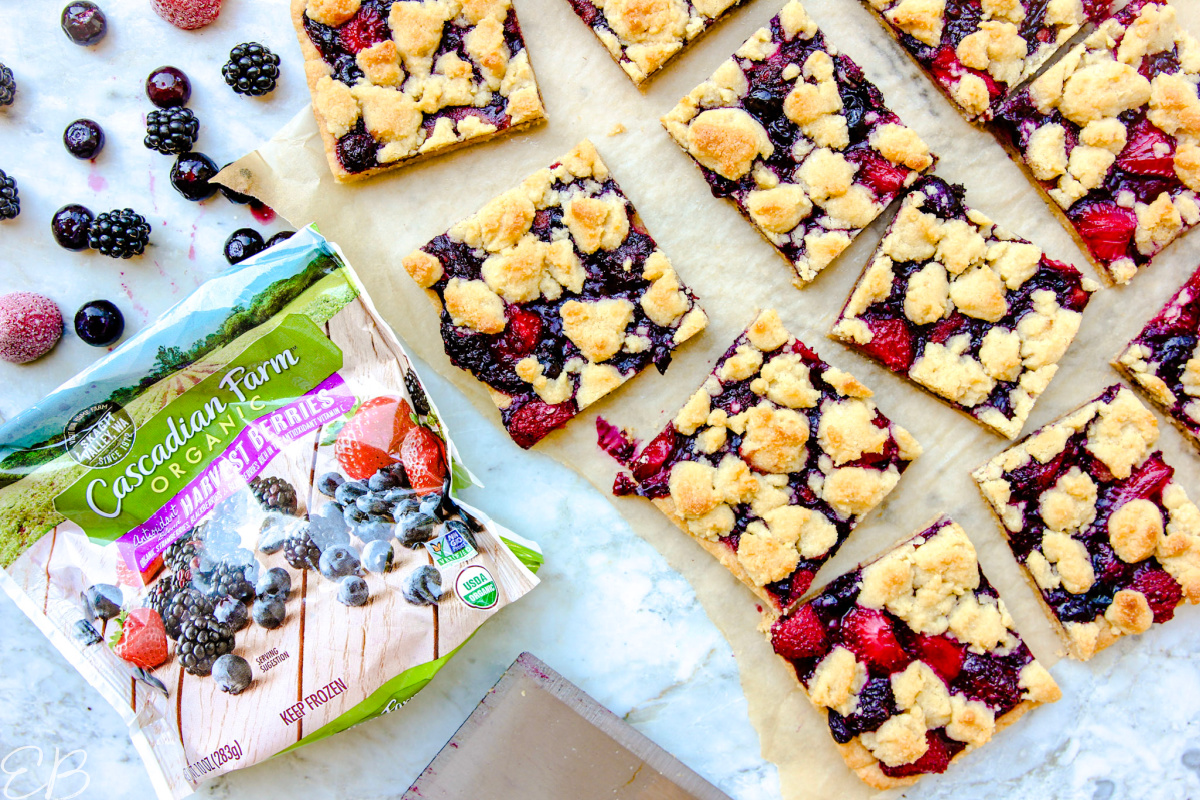
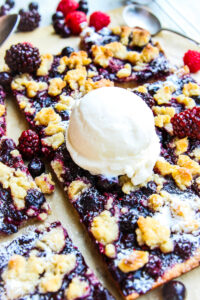
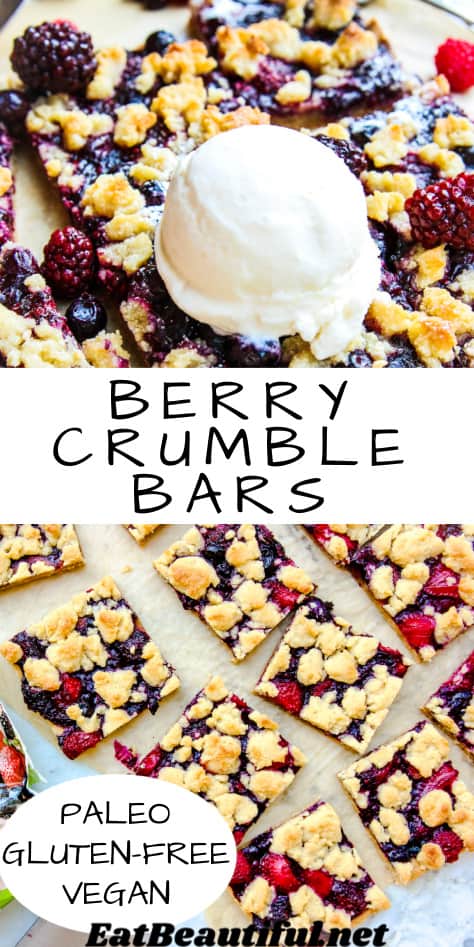
Berry Crumble Bars make the perfect dessert, snack or special breakfast treat. This easy to make pastry-meets-cookie bar works great year round with frozen berries, or make it in the summer with fresh. Paleo, Gluten-free and Vegan.
By the way, what is a Crumble Bar?
What makes Crumble Bars famously good is that they’re a little like a casual pie … but amazingly, the base of the bar and the topping are the same easy recipe! No rolling out and super fast, you get a treat that’s part cookie, part something fancy — all beautiful and berry delicious!

Ingredients in Mixed Berry Crumble Bars
Berry Crumble Bars use pretty classic Paleo and Gluten-free ingredients you likely already have:
- almond flour, tapioca flour and coconut flour — I like to use this blanched almond flour for so many reasons! It’s more sustainably grown [in its native habitat], organic and affordable.
- coconut oil — OR for non-vegan, it’s okay to use butter.
- maple syrup — AND maple sugar or coconut sugar. This combination of liquid and granulated sweeteners creates the right textured pastry dough.
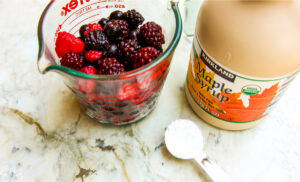
- mixed berries — I always use frozen because they’re easy, and we keep them on hand. But you can also use fresh if you prefer. I used a combination of strawberries, blackberries, blueberries and raspberries. I halved the strawberries and left the blackberries, raspberries and blueberries whole.
- baking powder and baking soda — Both contribute to the perfect pastry texture in the base and the topping.
- and sea salt
That’s all!
How to make Berry Crumble Bars
- Stir together almond flour, tapioca flour, coconut flour, leavening and sea salt. Add coconut oil and maple syrup, and combine.
- Press 3/4 of the mixture into prepared baking dish, and bake 10 minutes.
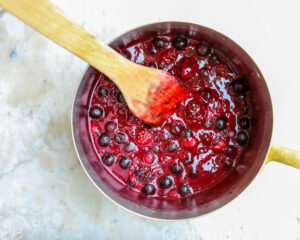
- Place berry ingredients in saucepan, and simmer until thickened, about 6 to 7 minutes total.
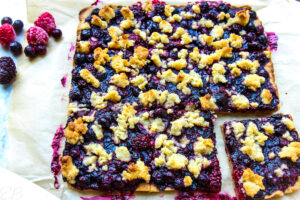
- Spread berry mixture onto partially baked bottom crust. Add topping in rustic crumbles.
- Bake another 10 minutes.
- Cool and chill before serving, so it holds together well.
This is an easy and fast recipe, rewarding to make. 🙂 Everyone will love it and you!

What pan to use
One of my all-time favorite kitchen purchases costs just about $10 and still looks new after countless uses. It’s my quarter size sheet pan. If you don’t have one and feel an interest, this is the one I have.
I make Berry Crumble Bars in it, because it’s perfect for making bars — with its low sides and how it conducts heat.
You may also use a 9″ x 13″ dish if that’s better for you, or something similar.
How to store Berry Crumble Bars
Berry Crumble Bars are best stored in the fridge. They get too crumbly when warm.
Store for up to 5 days in an airtight container with lid, or freeze for up to 3 months.


Mixed Berry Crumble Bars
Equipment
- quarter size sheet pan OR 9" x 13" baking dish
- electric handheld mixer (optional)
- oven
Ingredients
- 2 cups almond flour
- ¾ cup coconut oil melted
- ½ cup tapioca flour
- ¼ cup coconut flour
- ¼ cup maple sugar
- ¼ cup maple syrup
- 1 teaspoon baking powder
- ½ teaspoon baking soda sifted
- ¼ teaspoon sea salt
Berry Filling
- 10 ounces mixed berries or 2-½ cups; I use Cascadian Farms frozen Harvest Berries blend
- 1 Tablespoon maple syrup
- 1 Tablespoon tapioca flour
- pinch sea salt
Instructions
- Preheat oven to 350°. Line quarter size sheet pan OR 9" x 13" baking dish with parchment paper. Set aside.
- In a medium size bowl, combine dry ingredients: almond flour, tapioca flour, coconut flour, maple sugar, baking powder, baking soda and sea salt. Add maple syrup and coconut oil. Use electric hand held mixer, or stir together by hand, until well mixed.


- Press ¾ of the mixture (reserving ¼ for the topping) into the bottom of the prepared pan. (You don't need to press it up the sides at all.) Bake for 10 minutes, until golden brown all over.


- Gather the filling ingredients. Make the filling while the base is baking.

Berries Filling
- In a medium size saucepan, stir together berries, maple syrup, tapioca flour and sea salt. Cook over medium heat, stirring constantly, until thickened, about 6 minutes. (The liquid amidst the berries may thicken first, but if you're using frozen berries, continue to cook for the full 6 minutes, to be sure they're heated through/have released their watery juices.) Break up or cut any large strawberries as they melt (if frozen). Set aside.

- Remove bar base from the oven. Pour the berry filling onto the base, and spread it out evenly.


- Crumble the topping mixture evenly over the berries.


- Bake for 10 additional minutes, or until golden brown all over. Allow to cool. Then chill for 2 hours minimum before removing from the pan and cutting into squares. Serve chilled.

- Add ice cream if you want to dress it up.

Nutrition
You can Pin this recipe here:
Variations
Here are a few variations you can do with Berry Crumble Bars:
- Use just 1 berry, or a combination of 2 or 3, instead of the mixture of 4 berries I used.
- Add lemon zest to the crumble mixture: finely grate the zest of 1 small lemon.
- Use the juice of one small lemon in the berry filling. Stir it in after the berries are done cooking.
- Create a lavender scented pastry dough by adding 1 drop lavender essential oil when you add the coconut oil.
- Drizzle bars with Paleo icing for a pretty garnish. (Combine 1 cup coconut sugar with 2 teaspoons tapioca flour in the blender. Blend 30 to 60 seconds until powdered. Pour about half of it into a mixing bowl. [You won’t need all of it.] Add your favorite Paleo milk a little at a time until you have the right texture for drizzling.)
But, I will say, these bars are perfect as-is. They don’t need any changes. So just do one of the variations if you’re really excited about it. Otherwise, make the recipe with no changes, and you’ll be very happy with the outcome.
Find similar Gluten-free sweet treats:
- 7-Layer Cookie Bars (Keto, Paleo)
- Chocolate Chip Cookies (Paleo, AIP, Vegan)
- Paleo Vegan Carob Muffins
- Ice Cream Mud Pie with “Oreo” Crust (Paleo, AIP, Vegan, Keto)
- Strawberry Muffins (Paleo, AIP, Vegan)
- Vegan Strawberry Topping (Paleo, AIP, Keto)
- Tigernut Yogurt (Paleo, AIP, Vegan)

Jean Choi says
I love berry desserts, and these are wonderful! I like that you can vary it up with different kinds of berries.
Megan says
Hi Jean, I’m so glad you like the bars! Thanks for sharing your results, and yes, so nice they can be varied. 🙂
ChihYu says
I could eat the whole pan! Everything about these bars is perfect – the berries, the crust, the fun of using different berries. I especially like the tip of adding some lemon zest!
Megan says
Thank you, ChihYu, so happy you like the recipe!
Faeza says
Hi please what can I use with the atmond flour I ran out of armond flour thank you so much I just love this desert its the best
Megan says
Hi Faeza, you can make nut or seed flour from any nut or seed! 🙂 Just use a coffee grinder or food processor to create fine meal. 🙂
jennifer says
So EASY, I loved making these . . . since I’m not a huge baker I need simple bar recipes! Won’t like . . . ate most of mine for breakfast, but it’s a pretty darn good way to satisfy a sweet tooth!
Megan says
Hey, I’m all for enjoying pastries for breakfast!! 🙂 Especially with protein and before an active day! 😉 Thanks for sharing that you loved them and loved making them. That makes me so happy.
Stacey Crawford says
I love any treat that tastes like berry pie. I like that you used frozen berries with maple syrup as a sweetener as it really adds extra flavor.
Megan says
Thanks, Stacey, so glad. I agree; I love berries sweetened with maple syrup, so yum together. 🙂
Laura Treese says
Thank you for this recipe. Delicious! I have been looking for a recipe which I can use frozen strawberries from my garden. This also fits my dietary requirements. Even my husband, who shies away from grain free recipes, likes this one.
Megan says
Yay, Laura, thanks for sharing! I’m so glad you both are enjoying! We love this recipe, too. 🙂