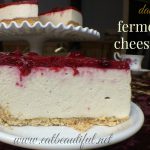
Dairy-free Fermented Cheesecake (Gluten-free, Paleo, Vegan)
Dairy-free Fermented Cheesecake is so delicious that you may decide it's the most delicious cheesecake you've ever eaten -- all without the side effects that dairy cheesecakes can cause. You'll enjoy the easy and magical fermentation process as much as the eating!
Servings 10 servings
Calories 705kcal
Cost $7
Equipment
- 9" cheesecake pan Use a very large pie plate if you don't have one. (With a pie plate you won't unmold the finished product; and you may have extra filling.)
- large mason jar or other fermentation vessel, ideally clear (see-through), but not necessary
Ingredients
The Filling
- 4 cups cashews (for the creamiest outcome) or macadamia nuts (okay to use part pecans)
- 2 cups pine nuts (or 2 more cups preferred creamy nut [like cashews] or seed)
- 1-½ cups filtered water
- 3/4 cup coconut oil melted and cooled slightly, divided
- 3/4 cup raw honey (use maple syrup for a vegan version; for Keto version, use favorite Keto sweetener)
- 1/4 cup lemon juice
- 1/4 + 1/8 cup filtered water
- 2 Tablespoons sustainably-sourced gelatin Use code BEAUTIFUL10 at check out for 10% off all items; (or use same amount of powdered agar agar for vegan version)
- 2 teaspoons vanilla extract
- 1/4 teaspoon sea salt
- 1/4 teaspoon high-quality probiotic see link in article for sourcing
The Crust
- 2-1/4 cups walnuts , sprouted* see method or cashews*
- 1/4 cup coconut oil melted and cooled slightly
- 1/2 teaspoon cinnamon
- pinch sea salt
The Raspberry Topping
- 12 ounces frozen or fresh raspberries defrosted if frozen
- 1/2 cup water
- 1/4 cup honey (for Keto version, use liquid allulose)
- 2 teaspoons sustainably-sourced gelatin Use code BEAUTIFUL10 at check out for 10% off all items. (or use agar-agar powder for Vegan)
Instructions
Filling and Assembly Instructions
- Place nuts/seeds in 4 cups water for 2 hours, to soften.
- Drain and rinse in a colander.
- Place soaked nuts/seeds, water, 1/2 cup coconut oil, lemon juice, vanilla and sea salt into high-powered blender. Purée on high speed 50 seconds. Purée in two batches if your blender can't handle this quantity, dividing the water and melted oil between both batches.
- Add probiotic and puree again, just briefly, 10 seconds.
- Pour puree into medium size deep glass bowl (the smaller surface area the better, no larger than 7" across) or jar, pressing down to release any air bubbles. Smooth top surface so it is flat. (Take care not to smear any puree on upper sides of bowl. All puree needs to be neat and flat for next step.)
- Optional step based on temperature: Slowly pour remaining 1/4 cup melted coconut oil onto surface of puree, taking care oil floats on surface instead of mixing into puree, as much as possible. It needs to cover entire surface of puree, and touch all glass edges. (This oil seals puree and creates an anaerobic environment. It is not necessary if you do the overnight ferment in the yogurt maker or in a very warm home. But for longer nut puree ferments of 2 days or more, in cooler homes, it is essential. Either way, this 1/4 cup of oil should be included in the recipe. I personally find it an easy and fun step and do it either way.)
- Loosely cover jar or bowl, so air can escape, but nothing can get in. If your container isn't clear glass, take note of puree's level, making a mark on its outside to indicate height.
- Place container is warm, dark location for 12 hours to 1.5 days, until you see puree become sponge-like and porous with many air pockets. The height of the puree will have risen as well.(Placing container in your yogurt maker can expedite the process so it's done overnight.)

- When puree is fermented empty contents into large mixing bowl.
- Place 1/4 cup + ⅛ cup water in small saucepan. Sprinkle surface with gelatin. Heat, stirring, for 1 minute, until gelatin is dissolved and water looks foamy. (If using agar agar powder, soak powdered agar agar in 1 cup water for 10 minutes and let it simmer for 5 minutes or until it dissolves completely.)
- Remove from heat, allow to cool briefly and add honey. Stir to mix.
- To the large mixing bowl add gelatin-honey mixture, folding it in gently but thoroughly. Set aside while you make the crust.
- Once crust is made, pour filling into crust and smooth the surface.
- Refrigerate for 3 hours.
Crust Instructions
- Place cashews into blender. Pulse until a FINE meal is formed. You want as few chunks as possible (without making nut butter). This will help the finished product crust hold together well.
- Add remaining ingredients and pulse again until oil creates a nice even crumble with cashew meal. Do not over-pulse or you will create nut butter.
- Dump crumble into springform pan. Press firmly into base and 1/2" up sides of springform pan.
Topping Instructions
- Place 1/2 cup water in small saucepan. Sprinkle surface with gelatin. Heat, stirring, for 2 minutes, until gelatin is dissolved and water looks foamy. (For agar-agar powder version, simmer 2 minutes, or up to 5.)
- Fold in raspberries and honey. Puree approximately half the mixture.
- Nest fine mesh colander over saucepan with whole raspberries and honey. Pour puree through colander and whisk to remove seeds. Gently fold puree together with whole raspberry-honey mixture, so partial chunks remain.
Final Assembly
- After cheesecake has chilled for three hours in fridge, pour raspberry topping evenly over its surface.
- Chill for three additional hours, or overnight, before serving. Serve!

Nutrition
Calories: 705kcal | Carbohydrates: 24g | Protein: 14g | Fat: 67g | Saturated Fat: 24g | Polyunsaturated Fat: 16g | Monounsaturated Fat: 19g | Sodium: 110mg | Potassium: 539mg | Fiber: 3g | Sugar: 4g | Vitamin A: 10IU | Vitamin C: 3mg | Calcium: 34mg | Iron: 5mg