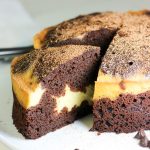
Cheesecake Filled Chocolate Cake
Cheesecake Filled Chocolate Cake is that moist, rich cake for which you LONG, but without a lot of work. The filling makes it so special, and the topping can either be rich and decadent (Easy Chocolate Ganache) or a quick dusting of cocoa. Oven OR Instant Pot.
Servings 10 servings
Calories 274kcal
Cost $6
Equipment
- oven OR Instant Pot
- baking pan OR cheesecake pan
Ingredients
Chocolate Cake
- 3/4 cup cocoa powder or substitute up to 1/4 cup cocoa with roasted carob powder
- 1/2 cup cassava flour Otto's brand, (see link below)
- 1/2 cup butter , ghee, or coconut oil, melted then measured
- 1/3 cup warm water
- 3 eggs , room temperature
- 1/2 cup maple syrup , honey or coconut sugar
- 2 teaspoons vanilla extract
- 1/2 teaspoon baking soda , sifted
- 1/2 teaspoon sea salt
- cocoa for dusting
Cream Cheese Filling
- 8 ounces cream cheese , room temperature (or chevre)
- 1 egg , room temperature
- 1/4 cup maple syrup
- 1 teaspoon vanilla extract
- pinch sea salt
Instructions
- Preheat oven to 325 degrees Fahrenheit for oven version of this recipe. Grease a 7-inch leak-proof cheesecake pan (for Instant Pot version) or 9-inch leak-proof cheesecake pan if preferred for oven version (see links below) or use any shape pan your prefer for the oven (a 9" by 13" casserole dish, a traditional 9" round cake pan lined with parchment etc.); but a leak-proof cheesecake pan is best for presentation. (If you use the 7-inch, you'll have batter left over, with which I make 2-3 black bottom cupcakes!)
- Make Cream Cheese Filling (recipe instructions below).
- In a medium sized bowl, sift together the dry ingredients: cocoa powder, cassava flour, baking soda and sea salt. Set aside.
- In a large bowl, using a hand mixer, blend together the wet ingredients. Alternatively, combine them in a blender or briskly by hand.
- Add the dry ingredients to the wet ingredients and fold together with a rubber spatula until completely combined. Do not over-mix. Pour into the greased pan.
- Using 2/3 of the mixture, ladle large dollops of the cheese filling (recipe instructions below) around the surface of the cake. Use a spoon to push down 1-2 inches on each dollop, so the filling goes into the center of the chocolate batter. Use a spatula to scrape the remaining cheese batter over the surface of the cake; and spread it out evenly, not all the way to the edges, leaving about 1/2 an inch of chocolate batter showing around the circumference of the pan.
Cream Cheese Filling
- Place all filling ingredients into blender or medium sized mixing bowl. Blend on low speed, or use hand beaters to combine until thoroughly mixed and creamy, about 25 seconds. Set aside until above recipe calls for filling.
Chocolate Cake (Oven Instructions) — See Instant Pot Instructions below.
- Bake for about 45 minutes in preheated oven until the edges are puffed and the center is slightly puffed and golden and beginning to look dried out on the top with very little jiggle if you shake the pan side to side. Cooking times will vary slightly based on the size of the pan and the depth of the cake; check cake(s) after 25 minutes if you're using the batter divided between two pans (see Recipes Notes for this idea).
- Allow to cool. Using a wooden knife, unclasp the outer ring of the pan and slide the knife around its circumference. Remove pan's sides. Use wooden knife again, if needed, to release the base of the cake from the pan base. Transfer cake to serving plate. Sift remaining cocoa over its surface until cream cheese is completely or partially covered, whatever looks prettiest to you. Refrigerate until ready to serve.
Instant Pot Instructions
- Place trivet/steam rack in the bottom of the Instant Pot insert, and add 2 cups of water. Place covered cheesecake pan on the steam rack. (To cover cake: Cover the pan with tin foil over parchment paper; or use parchment paper and place a small salad plate over the paper [to keep it down and somewhat dry during cooking].)
- Make sure rubber ring is fitted inside lid, place lid on Instant Pot and seal steam vent. Manually set the time to 35 minutes on "high" pressure using “+” button. When timer goes off, allow 10 minutes of natural pressure release.
- Then cover steam vent with dish towel (and/or use Steam Boss accessory [link below in Recipe Notes]), quick release the remaining pressure and carefully remove pan from Instant Pot to cooling rack.
- Allow cake to fully cool, about 4 hours. Open springform pan while using wooden knife to loosen cake’s sides from pan, if necessary. It should actually come away from the sides really easily.
- Top with dusted cocoa powder or Chocolate Ganache. See Ganache link below in Recipe Notes.
Notes
Find the Chocolate Ganache recipe HERE.
7-inch and 9-inch Springform Cake Pans
- This is the cheesecake pan I have. Unfortunately all cheesecake pans these days are non-stick. That's why I use a wooden knife with it, to protect the coating. I like this pan because it's leak-proof! That means I can pour liquid cake batter into it! Also, I purposefully got this size because it fits into my Instant Pot! So you can make cakes and cheesecake in your IP, which works great and is very easy-- and thus super exciting and rewarding! Only downside to this size is that all the batter will not fit. Yet I like this tall, smaller, charming cake (and that this pan fits in my IP) so I make 2 black bottom cupcakes with the leftovers, that I can put in school lunches or send with my hubby to work or eat myself for breakfast!
- Here's the 9-inch leak-proof cheesecake pan, which will actually fit all the batter from this recipe, if you prefer (which many will) to get 10-12 servings from one cake.
- Lastly, here's a great, basic cake pan. This option works well if you simply press parchment paper down into the pan, flattening all the wrinkles along the sides and cutting off any portions that stick up too high around the edges. When the cake is done, you just gently pull up on the parchment sides, set the cake down and then slide it onto a serving plate. The edges of the cake will show slight crimps from the paper, which actually looks just slightly rustic and quite lovely. I like this option because even if a batter touches the pan aluminum in safe for baking (just no acidic ingredients in the batter like lemon or tomato); there's no non-stick coating, and it conducts heat well. It's what commercial kitchens use for their cakes; and the pans last forever.
- Final exhaustive note on sizes, you can fill the batter as high or as low you want; so you can even make two cakes with this recipe. Yesterday I made this recipe again, and I made one 9" cake that was almost 2" tall when it was done and so pretty, and one 5" cake about the same height for a separate occasion. The first cake made 8 nice wedges. The second could be cut into 4 chunky wedges or 6 charming pieces for small, lovely portions. In short, this recipe is versatile and inspires one to serve it in many ways, all pretty and fun.
Here's the cassava flour I use and love.
Find the Steam Boss HERE.
Nutrition
Calories: 274kcal | Carbohydrates: 22g | Protein: 4g | Fat: 19g | Saturated Fat: 11g | Cholesterol: 115mg | Sodium: 352mg | Potassium: 110mg | Fiber: 1g | Sugar: 16g | Vitamin A: 683IU | Vitamin C: 1mg | Calcium: 70mg | Iron: 1mg